Featured Post

Go Galette Go! My heart will always Galette on…

5 Beautiful Galettes: Red Pear Galette, Peach Tej Patta Galette, Panchphoron Mango Chutney Galette, Cherry Clove Galette n Paneer Tomato B...

Showing posts with label Fusion food. Show all posts

Saturday, November 26, 2016

The Kingdom of a King Prawn

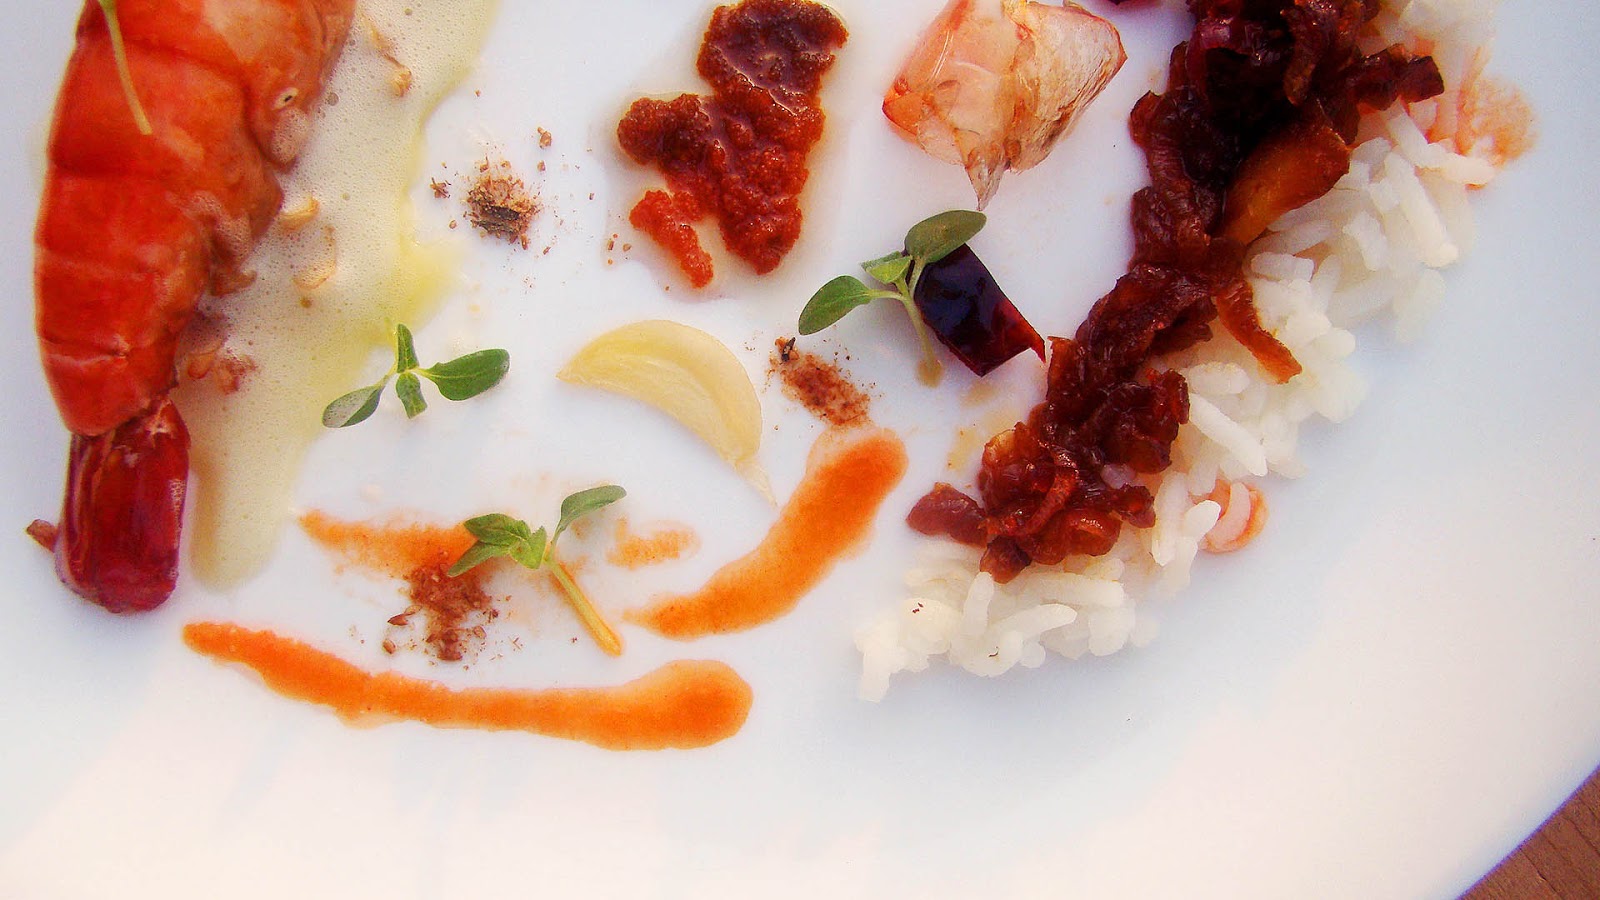
King Prawns Poached in oil with caramelized onion buttermilk sauce served with Lime Sabayon, poached garlic, preserved prawn roe in oil


Cooking king prawns is a challenge, they look fantastic in the fish market, giant body, big claws, hues of blue all over the body, it looks like an alien animal to me at times, inside the crust of this crustacean lays the tender soft flesh, which is a delicate protein. In India there are so many amazing recipes with prawns n king prawns and one of them is the timeless classic: Chingrir Malaicurry aka Prawn Malaicurry, some people say they are the best with king prawns, I don’t think so, they are just as good if not better with medium sized prawns, but if you are cooking with king prawns it will be a huge disappointment when you end up with solid hard prawns, literally overcooked. But then when I think of it, it has become an established texture in here when it comes to prawns, we do eat prawns when they are not very soft but a bit firm, a bit chewy and we enjoy it, but sometimes it’s goes a bit too much due to overcooking, I remember eating king prawns at house-parties where they have become so solid, eating that was a mess.


While creating this recipe I approached the king prawns softly, ha-ha, well I mean I cooked them, beginning at low temperature, because the prawn protein is delicate n overcooks easily at high temperatures, low temperature cooking gives a great result, I start with immersing the marinated prawns in cold oil and I let the oil go hot slowly but I never let the oil reach a very high temperature, for doing this first of all you need a thick bottom saucepan, if you don’t have that you can always layer a saucepan over another flat pan or over a heat diffuser, in that way the temperature will be consistent n never go high quickly. Cooked in this way the prawns will stay soft n moist even after hours.


I infused the oil with dry red chili n garlic n red onion; the infused oil delivers the flavor to the prawns submerged in them. I serve the prawns with white rice; the best combination possible with lime sabayon which is light, foamy n has the citrus flavor. The poached onions are further sautéed in the pan concentrating their flavor even more n I finish them with buttermilk which gives a slight tang.
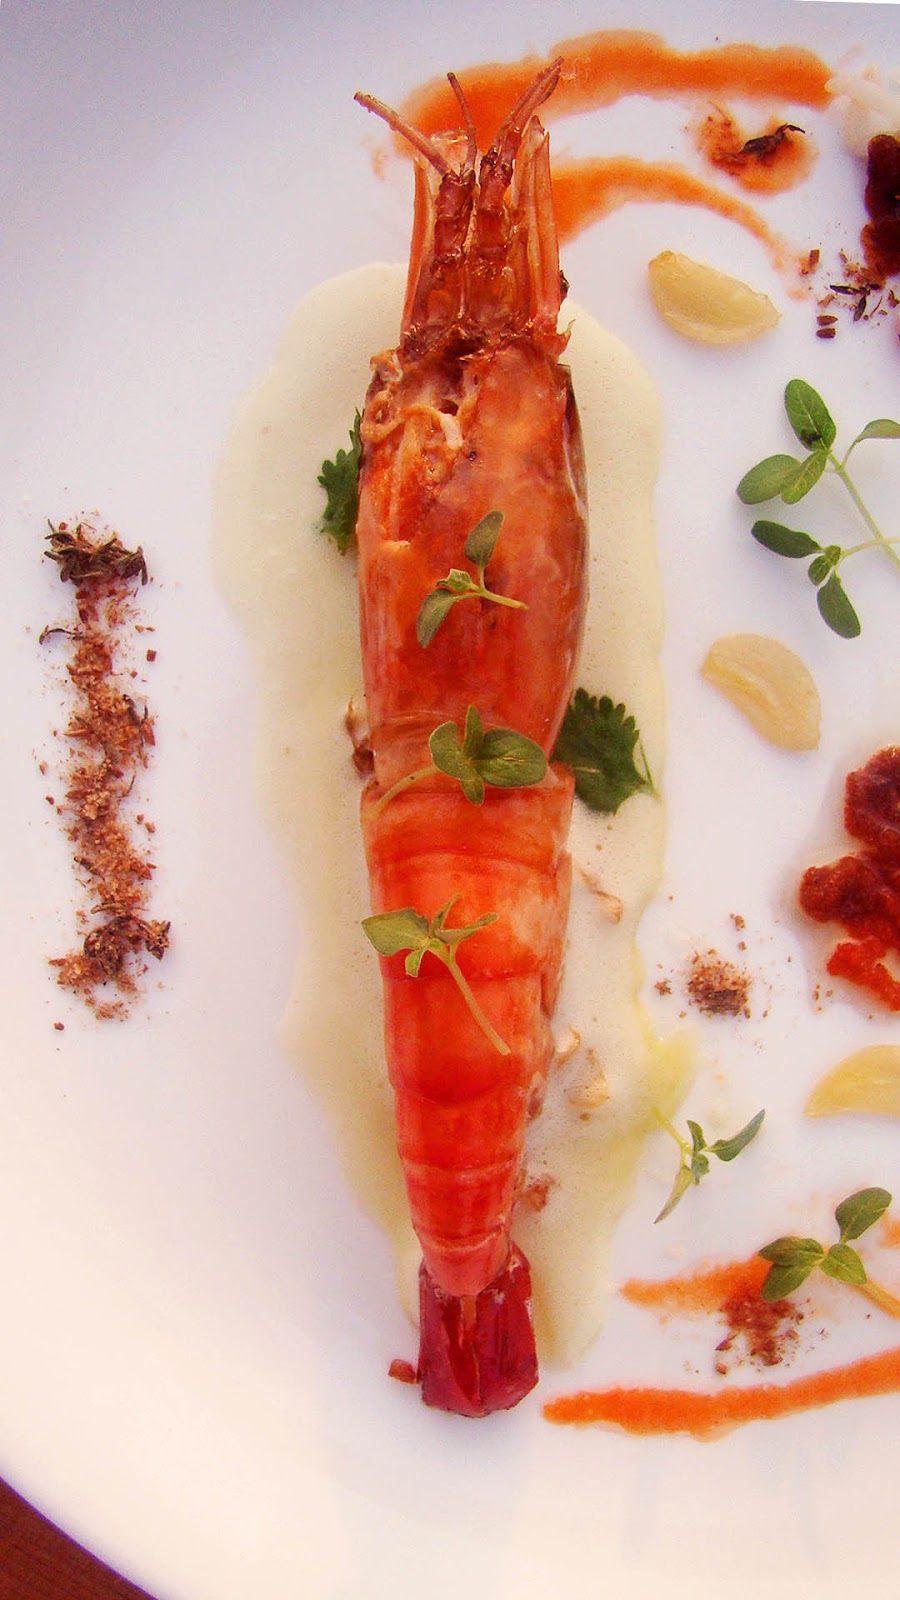

You can fry the shells in hot oil until they go crispy and you can eat them! They will provide the crispy crunch in the dish. The prawn roe preserved in oil adds a unique flavor; it has that umami rich flavor which is still mellow n just wonderful. For a little sweetness I used red bell pepper jus but it is just optional. For freshness the use of fresh coriander leaves is unbeatable, I love the flavor that goes so well with this dish, the sesame micro herbs doesn’t provide a boost of flavor but adds a fresh crunch n nutrition to the whole thing.


I used cumin thyme salt in the final serving, I keep it at a place so that someone can eat it at their will, for preparing the salt you need to roast some cumin seed on medium heat for about 2-3 minutes until they becomes fragrant n then crush them to a coarse powder, mix sea salt along with dry thyme leaves with the cumin powder and you got thyme cumin salt.

So now I will take you to the recipe.


For The Recipe: You will need

For the Prawns:
King prawns- 200 gm take the vein out from the tail end but keep the shells on
Vegetable oil – 2 cups
Shallots or red onion- 1 medium, sliced
Garlic -6 medium cloves, cut into long thin slices
Buttermilk- 4 tbsp
Turmeric- ½ tsp
Dry red chili-1 medium, chopped roughly
Red chili powder- ¼ tsp
Cumin powder-1/4 tsp
Red chili flakes- ¼ tsp
Salt


For the Sabayon:
Egg yolk-2
Butter-30 gm, melted
Lime/lemon-1 tbsp
Water- 1 n 1/2 tbsp
White wine- 1 tbsp
Salt
Black pepper

For the prawn roe in oil:
Prawn roe, extracted from the belly of the prawns in any- as much as u get
Vegetable oil- 4 tbsp
Salt- some pinches


1. Begin by marinating the prawns with shells with turmeric n salt, sprinkle the turmeric n salt n leave them for about 15-25 minutes, after that time wash them well in water to remove the excess salt n turmeric n pat them dry. Take a saucepan which is narrow, in that way you can get a good height of oil to submerge the prawns in a little amount of oil, so pour the vegetable oil in a heavy bottom narrow saucepan n add the sliced onion n the garlic n chili slices, if you don’t have a heavy bottom saucepan, keep the saucepan on top of another frying pan, then put the heat on to low to medium, we are infusing the oil with the garlic n onion, you need to give it about 10-15 minutes like this, at the end of the time the garlic n onion will seem to sizzle slightly  n leave bubbles from them, the garlic should not change color, they will still remain white n the onions will be very soft, take them out with a spoon n put them in another frying pan, put the narrow saucepan away from the heat for 5 minutes, then add the prawns in the oil making sure they submerge in the oil completely and put them on low heat, keep aside some of the garlic poached previously n add the rest in this oil,  nothing will seem to happen at first but the work is already happening, the mild heat of the oil is poaching them gently, give them about 5-8 minutes in oil, as time passes the prawns will turn very red or orange n will begin to leave bubbles from them n sizzle slightly in that oil, check after 7 minutes by taking out a prawn n cutting it through with a knife, it should be white inside n should be very soft, they will be ready after 8-10 minutes, take them out.

2. Put the frying pan with the onions on low medium heat, let the onions brown a bit, and when they are brown add the red chili flakes, chili powder n cumin powder along with salt n 2 tbsp buttermilk, give them 2 minutes, if they buttermilk has completely dried up add the rest now, mix well, taste n adjust, its ready.

3. For preserving the prawn roe in oil, sprinkle salt over the roe, heat the oil in a pan but not to smoke point, then pour the medium hot oil over the roe, give them an hour, this oil n the roe is now ready to be used, will stay in the freeze for 2 weeks.

4. For the sabayon, combine the egg yolks n water n white wine in a bowl, whisk with a wire whisk over a bain-marie until the eggs become very light n airy, take the bowl off the heat every 10 seconds to make sure the eggs don’t scramble,  taste it after 1 minute of whisking, it should not taste very much of eggs, keep whisking for 1 minute, when the mixture becomes airy take it off the heat and continue whisking it until it becomes very light, then add the melted butter, then add the lime juice n season with salt n pepper, this light lime froth is ready to be served.

So we are done, for serving I will suggest white rice goes amazing with these prawns, take a little rice, add the caramelized onion sauce over them, then add some of the reserved garlic cloves n some roe, take the shells out of the king prawns and add some fresh coriander or parsley n little bit of sabayon, take a bite, let the eyes remain closed, Bon appétit.

Sunday, September 11, 2016

Tom Chick – a sweet n sour flirt in the kitchen- chicken with tomatoes n some more tomatoes

Chicken with Fresh Tomatoes, Sweet Soy, Ketchup n Garlic n that’s all and we have got Tom Chick - An absolutely fast, easy n delish eat 


I guess I have a thing for sweet n sour things, some kind of thing you know, it lifts the mood to become alive and it doesn’t have to be summer to feel this! Winter makes no difference; the combination of sweet n sour is like watching the clear sky filled with bright stars after many gloomy days.


You got to have recipes in your brain that is fast, flavorful n amazing for all those times you come home after a long tiring day and you still have to cook or you wanna cook but you don’t want to spend too much time doing it-this chicken recipe is for those days, it is a savior! Its quick but more than that it’s so delish like totally finger licking…make it for your friends and watch the scene, all you need for the recipe are tomatoes, chicken, sweet soy sauce, tomato ketchup (yeah that’s right!), garlic n black peppers n pink rock salt(shoot this salt if you haven’t already got it).


The basic inspiration for this recipe was tomato-the day I was designing this dish I was telling myself the whole thing has to be very tomato-y n absolutely delish, so it comes in 2 forms, the fresh ripe tomatoes and the ketchup, you can use tomato concentrate in this recipe also if you have got some, or passata or homemade tomato sauce that you made for your pasta, all will do.


Another interesting ingredient is the sweet soy which is like a syrup n thick which is off course sweet with s light hint of smokiness in it n it reminds me of molasses, the Indonesian Kecap Manis is just that thing, it’s dark, deep n sweet. So get that in your home and it will add a very cool dimension to your cooking, ask for sweet soy sauce or kecap Manis.  If you have not got sweet soy but a good quality normal salty soy sauce you can still use it, add some sugar to it or palm sugar to it to give it some sweetness.


For this recipe try to use ketchup that is not very sweet, taste it first, if it feels very sweet use it in lesser amount to balance that taste. And you got to have bread in your home, because this dish goes so well with breads, more than it goes with rice, a hot bowl of this tom chick n lightly warm bread or crispy parantha and oh my god, this is enough to create good moods. Tom Chick-yeah that’s what I call this recipe! 


So now I’ll take you to the recipe.

For The Recipe:  You will need
Chicken thigh including drumsticks- 250-300gm, cut into 3 or 4 medium large pieces on bone
Tomatoes red ripe- 4, chopped
Garlic – 6 medium cloves, peeled n kept whole
Red chili flakes- 1 tsp
Black pepper- 10
Sweet soy sauce- 1 – 1 ½ tbsp
Tomato ketchup- 1 -1 ½ tbsp
Salt
Pink rock salt/Himalayan salt- 3 pinch
Vegetable oil- 3 tbsp
Butter- 1 tbsp


1. Place a heavy based frying pan or wok on low heat, add the oil n then the butter, add the whole black peppercorns n the garlic cloves, on a low heat fry them for 1 minute until you see they are just beginning to color, at that point add the chopped tomatoes and increase the heat to high for 30 sec, toss them around then reduce the flame to low n give them 4 min stirring in between, then make shallow slices in the chicken pieces for them to cook quickly and put them in the pan n increase the heat to medium high, sauté them for a good 7/8 minutes on medium heat until they get light brown to brown color all over, so you need to flip them after every 3 minutes, at this point of time we are frying the chicken really well to get caramelized along with the tomatoes, the tomatoes are getting all cooked and getting to almost a paste, we need to sauté chicken for about 8-10 minutes like this on medium heat, when they get well colored on all sides, add salt, pinch of pink rock salt n the sweet soy n tomato ketchup n mix well, then cover the pan with a lid, reduce the flame to minimum n give it 2 minutes, then  add the red chili flakes according to how hot you want it to be, add a splash of water if you see it is browning a bit too much, the water will cool it down n thin out the consistency, cover again and from this point on give it about 10 minutes until the chicken is cooked, stir in between n flip the chicken pieces and add a splash of water a couple of times if things are drying up, when the chicken is cooked check for the seasoning n adjust, add a little more sweet soy n ketchup if you like. Then put the flame off n give it 2 minutes standing time and then boo-hoo you are done!
2. I presented the dish with carrot puree, but it’s just optional, for the puree I boiled the carrot until they are just tender, then I blend them with extra virgin olive oil, a blob of butter, a touch of lime juice n salt n touch of water n that’s all. 


Walla! So the chicken is ready in about 20 minutes and there is no big cutting chopping required and now it is time to taste the tom chick, so go ahead, dip the spoon n lift the out dark red gravy with a piece of soft chicken n taste it…………….yeahhhhhh! I know, I know…so good right! Sour n sweet n yummy, eat it with lightly toasted bread it will be a great delight, its kinda addictive. Bon appétit!


Sunday, August 21, 2016

Coconut Peach American Buckle with Buttermilk: a piece of Sweet Baked Summer

How the summer buckled my mind- American Coconut Peach Buttermilk Buckle with streusel served with Peach Gel n Vanilla Ice-cream 


The summer days have been replaced by the pouring monsoon for some time now and I am left with the memories of summer- hot, cruel, extremely humid n dry at different times, even though I say so, the days in the monsoon when it doesn’t rain, it’s still summer-a more kind, pleasant soft tone of summer. Summer is totally about mangoes, the most pre-dominant smell n color if you take a walk down the fruit market, is that of the mangoes. At the same time from up in the Himalayan mountains of Himachal, Uttarakhand comes down red ripe cherries, apricots, plums n peach- much less in quantity but beautiful in their color n taste. Every year I do this- I buy a box of cherries and keep eating from them for a long time as the box relaxes in the refrigerator n make dishes out of them once in a while.


Peaches are very fragrant- there is a certain fragrance about them that is more special to me than their taste, it is a sweet aroma, if you smell closely closing your eyes you will understand what I mean. The ripe peach gets sweeter with time and peaches do keep so well in the refrigerator that you can forget about them for a long time and one day come running back fearing they must have gone all bad and then you figure they are very fine.


At times I make a peach compote with sugar n Indian bay leaf and it tastes fantastic, it combines so well with a crispy baked crumble or on top of a warm galette, the warm buttery crumble with the soft peach compote with a sense of sharpness-what  beautiful  bites n a touch of melting ice-cream. When I think of this it makes me crave for it more n it also reminds me of a buckle.


A buckle is rich, dense fruit cake where the fruits rests on top of the cake batter, though some can be mixed inside the batter, and the fruit is then covered with streusel which is a topping with 3 essential parts-butter, sugar n flour, at times various nuts n spices are added to it and the whole mixture goes beautifully brown n a bit crispy being at the top of the cake n the fruit. Traditionally the buckle is often prepared in cast iron pans; they have their origin probably in the United States where they are largely popular and where people bake it using fresh summer fruits like blueberry, peach, and nectarine, raspberry. As the cake batter rises in the oven it incorporates the fruits on the top layer n causing the top layer to buckle, the finished cake often has a crinkly or cracked surface.


In my buckle I bring together two flavors, coconut n peach, coconut is so Indian n tropical n summery and I love how the flavor of peach n coconut mingle together in the oven, so its fusion of Indian n American flavors. I have also used home-made buttermilk for this recipe but you can simple make the buckle with eggs, it’s not necessary, if you do use buttermilk make sure it is a good quality buttermilk because it gives off a different flavor. You can make your own buttermilk easily by diluting fresh rich yogurt with water n churning it with an electric hand whisk or a traditional hand-held churner, after about 6-10 minutes the fat will separate from the liquid, skim off the fat as it separates out, when almost no more fat is coming out of it you have buttermilk in your hands, it’s that simple.


So now I’ll take you to the recipe so you can make it yourself.


For The Recipe: You will need

For the Cake batter:
Flour-160 gm (1 ¼ cup)
Butter-115 gm at room temp (Or 1/4 cup butter+1/4 cup veg. shortening)
Sugar-120 gm, powdered (1/2 cup)
Egg-1 at room temp (use 3 eggs if not using buttermilk)
Vanilla extract-1 tsp
Buttermilk- 80 ml (1/3 cup)
Baking powder- 1 ½ tsp
Salt -1/2 tsp, skip if butter is salted
Baking soda- ¼ tsp (optional, skip if not using buttermilk)
Peach- 3 big peaches, peeled n cut into ½ inch thin slices


For the streusel:
Dry coconut flakes- 4/5 tbsp
Butter- 50 gm cold (1/4 cup)
Sugar/brown sugar- 50 gm (1/4 cup)
Flour- 35 gm (1/3 cup)


For the Peach Gel:
Peach- 1 big, peeled and the flesh pureed in a blender
Agar-Agar- 1 stick or ½ tsp if powder, if stick cut the stick in little pieces and soak in cold water for 15 minutes
Sugar- 2 tbsp
Lime juice- few drops
Salt- a pinch


Pre-heat the oven to 180 C/350 F, butter an 8 inch cake tin or 10 inch cast iron skillet


1. Start with the gel, soak the powder agar agar in 100ml cold water for 10 minutes, then  bring the water to a boil and simmer for about 5-10 minutes  stirring often until the agar agar stripes or granules have dissolved completely, you can check this by lifting the solution with a metal spoon and as the liquid drops from the spoon it should have no specks of agar agar, if there is simmer it for some more time, when it is ready add the peach puree and mix well, then add the sugar, taste n adjust, add the lime juice n salt. Take it off and pour it into your mould, let it come to room temperature and it will set on its own, you can also keep them covered in the refrigerator until needed.

2.  Start by creaming the butter in a big bowl, add the sugar n cream until pale n smooth, add the shortening if using n cream it at this stage, next add the egg and mix until smooth, add the vanilla n mix well.

3. Mix the flour, baking powder, baking soda n salt and sift on top of the butter mixture, whisk to combine until almost uniform, and then add the buttermilk and mix until uniform n smooth, don’t over mix, just as everything mixes homogeneously you are done.

4. For the streusel take the cold butter in a flat plate, flour , brown sugar and the dry coconut flakes, n cut with knife into smaller lumps, do it for 5-8 minutes until the limps are really small n the mixture looks like slightly wet sand.

5. Pour the cake batter into the pan or iron skillet and top the surface with the peach into a circular pattern, when done cover the peaches with the streusel mixture, then into the oven for about 40-45-50 minutes until a toothpick inserted comes out clean and the streusel have gone well brown n crispy, for that to happen I often put the top grill on for the last 10 minutes in the baking time.

Take the pan out onto a wire rack n rest for 10 minutes, then flip it over onto a plate and then flip it back to straight and you are done!


It looks quite interesting n inviting, isn’t it? And the smell is so delish! Serve it warm with some vanilla ice cream or peach ice-cream if you have got, you can even eat it at room temperature. You can cut small pieces and put them on plates with peach gel and dollops of ice-cream together, and take little bit of each in a bite. You will surely see the faces light up as you serve your friends n loved ones. Bon Appétit.

Sunday, August 7, 2016

An Afternoon with Thai Green Curry- a Mortar full of Memories

Thai Green Chicken Curry in all its justified glory n finding music inside the mortar n pestle with the amazing food of Thailand


If you want to make a great Thai Green Curry n not just a good one-Be Brave, make your own green curry paste, get a big deep mortar n pestle n gather kaffir lime leaves, shallots, lemon grass, coriander roots in that and start bashing them, it is going to be a long time till they surrender to you and you got to have patience in your heart n eventually you will find the music – I promise you that. Start with preparing the green curry paste with enough time in your hands like 20/25 minutes and everything will fall in place.


The morning I set out to make the green curry paste I was tested by many things- hot humid summer, patience n getting stung by a hornet! I gave myself 20 minutes for the curry paste to come into being, but if you are making it for the first time it will get stretched into 30/35. It really helps if you have a big deep mortar n pestle made out of stone or a combination of metal n wood, a small wooden or marble mortar n pestle will make things really difficult for you, every ingredient will try to jump off your mortar and it will bring the flames to life in your head, so if you don’t have the right equipment, simply transfer the whole thing to blender n blend.


The rule of making the green curry paste is that the ingredients with the least amount of water content n which are hardest in terms of texture will go first inside the mortar, e.g.  The shallots will go last and the lemon grass n coriander roots will go in the beginning.

There are so many elements to Thai cooking like e.g. in the green curry itself, the process is so similar to Indian cooking, in both the cuisines there is detailed use of spice and it is not hard to see why, for many thousands of years India n Thailand are close neighbors and extensive trading across the sea took place for centuries, both the cultures influenced each other, people migrated from both the countries and it is a continuous process. I find Thai food to be amazingly aromatic, talk about fragrant Thai green curry, red curry or Thai jasmine rice.

Now you know what! When you are making either a chicken or fish or vegetable Thai green curry you can start the cooking without adding any extra oil, in traditional Thai green curries they often start with simmering the coconut milk until it thickens n specks of fat separates out from the body of the coconut milk and in the process of cooking more oil is released from it and from the chicken itself or fish, so the final dish has specks of shiny oil floating around it. However there are people who still begin with a dash of oil in the beginning, I’ll ask you to add no extra oil if you are making chicken version because the chicken fat will be another source of fat.


The kaffir lime leaves are magic, they make the air n the curry go pregnant with their amazing smell, if you have not got kaffir lime leaves, use other lime leaves, the lime leaves are sturdy , so they can withstand 20 min of simmering. A traditional Thai green curry will obviously have shrimp paste n fish sauce in them, when you don’t have both or can’t use them use a good quality soy sauce for the umami flavor, there is no good substitute I know for shrimp paste, but let me truly assure you that your green curry will still be very very good. So I think it is time to get cooking, so let’s crack it.

By the way if you get stung by a crazy hornet like I got while making the curry paste, blend and onion and rub its juice over that place and it will relieve you of the pain n swelling in great amounts in a short time.


For The Recipe: You will need

For The Green Curry paste
Cilantro/Coriander Roots- 1 tbsp (yes the roots which are submerged in soil, wash well n use them)
Coriander seeds-1 tbsp, slightly roasted
Cumin seeds-1/2 tbsp, slightly roasted
Galangal-1 ½ tbsp
Garlic- ¼ cup
Kaffir Lime/Lime-1, zest
Lemongrass-3/4 tbsp, sliced
Shrimp paste- 1 tsp
White peppercorn-1/2 tsp
Salt-1 tbsp
Shallot-1/2 cup, sliced
Chili Leaf-1/4 cup (optional)
Green Thai Chili Peppers/ green chili-10/15

For the Green Curry
Chicken – 450-500 gm, thighs with bone, cut into 2 inch pieces
Chili peppers- 1 thinly sliced
Coconut milk – 1 cup (use the first press and second press separately if you made your own)
Green curry paste-1/2 /3 tbsp
 Green colored Eggplant-1 big quartered
Pea eggplant- ¼ cup
Fish sauce-2 tbsp
Kaffir lime leaves-4/5
Sugar/palm sugar- 1 tbsp
Thai Basil- 3 springs
Water-1 cup


1. If you are making fresh coconut milk, begin with it, cut the coconut flesh into stripes, then cut away the brown shells, then put them in a blender, add very little water so that we can make a smooth paste out of it, when it is smooth, take it out in a muslin cloth and press hard to extract as much coconut milk as you can, this is the first press, then put the flesh back into the blender, add more water and blend again to get a very smooth paste, then like before press the second extract in a different bowl, keep aside. While you rest the first press for 15 minutes you will the thick fat part is floating on top, remove it in a bowl, we will start the cooking with this creamy thick part.

2.  In a heavy deep mortar n pestle grind the coriander n cumin seeds which has been slightly roasted in a pan for 5 min, make a powder of them in the mortar, then add the lemongrass n pound, then the galangal and bash again, then add salt, garlic n kaffir lime zest, bash again until the fibers are breaking apart now, add the cilantro roots n shrimp paste and keep pounding. Then add green chili n leaves, pound until the mixture turn into a fine paste so that you don’t recognize individual ingredients. It will take good 20-30 minutes.

3. In a heavy based pan add the separated coconut milk extract n simmer it for 5 minutes on low flame, then add the green curry paste n stir well, bring to a boil, then lower the heat, let it simmer on low heat stirring in between so nothing is catching in the bottom, cover n cook on low heat for 3/5 minutes, if the mixture starts to get dry add more coconut milk from the rest first extract. After simmering it for 5-7 minutes you will begin to see thin layers of coconut oil developing on top, this is the time for the chicken to go in, stir well n add some more coconut milk if it is going dry, if you are using chicken breast pieces it will cook in 5 minutes, since I am using thicken thighs on bone it will take 15/20 min for me,  after 5 minutes of putting the chicken in, add the palm sugar n salt, mix well, then add all of the coconut milk including the second extract and some water, let it come to a simmer on medium high heat, add fish sauce. Then add the quartered eggplant pieces n simmer for 10 minutes on low heat, then add pea eggplants n give them 5 more minutes, add the chopped kaffir lime/lime leaves and give it 5 minutes, by now the chicken will be soft n tender. Put the flame off and sprinkle the Thai basil leaves and the fresh chili slices and give it 5 minutes standing time.


We are literally done with our great Thai green curry and time to taste. So go ahead with a spoon and let’s agree there is nothing quite like it. Serve it with hot white rice or Thai jasmine rice and the combination is to die for. Absolutely share it with family n friends and watch their faces transform ;) it’s great. Bon appétit.