Featured Post

Go Galette Go! My heart will always Galette on…

5 Beautiful Galettes: Red Pear Galette, Peach Tej Patta Galette, Panchphoron Mango Chutney Galette, Cherry Clove Galette n Paneer Tomato B...

Showing posts with label Indian cuisine. Show all posts

Saturday, March 19, 2016

The Bold N the Beautiful –Chicken Schnitzel

The Charm of a Crispy Chicken Schnitzel with lime zest, Cardamom, Cinnamon with Sweet Chili Garlic Sauce and Wasabi Yogurt Raita 


Let’s utter the truth in the first sentence- a chicken schnitzel is intoxicating, exciting, amazing. If you have never tried this before, it can change the way you eat chicken after you eat this, let me assure you that. It will make you fall in love with it from the first bite, it will take control of your mind and make you cook this again n again- well fair enough-especially when it tastes this good n rather easy to cook, just remember the magic sequence- flour-egg-breadcrumbs.


The chicken schnitzel is a chicken cutlet, schnitzel is the German word for cutlet, the term is applied to chicken or meat that is coated in bread n fried until crispy and there lies the magic apart from the flavor- it is the crispy texture of the food that is so appealing to us, the bread coating with the egg beneath it- gets crispy n flavorsome in the process of frying and the chicken inside stays soft n juicy- this is the kind of food which makes my eyes closed when I’m eating them- you know what I mean…bliss.


Now you know me, I love to incorporate flavor in my food n I have not got very straight hands even when cooking a traditional recipe, I will eventually modify it. Thankfully there is no set recipe for chicken schnitzel, I mean there is but it’s flexible and almost in every country we will find food in this structure. Here in this part of India I grew up eating chicken culet n chicken Kobiraji cutlet all the time, so it is kinda in my genes. By the way let me tell you that chicken Kobiraji cutlet is a cutlet covered with crispy egg all around it n it is total fried heaven.


So talking about flavor, I begin by marinating the chicken breast overnight with lime juice, minced ginger n garlic, dry rosemary, sliced red chili, a touch of salt n sugar, if you have skipped overnight marination, give it 2-3 hours. Marination does help in two ways, first it incorporates flavor into the flesh, second it makes the chicken soft because the lime juice is an acid so it starts breaking down the protein molecules slowly, and as the result of marination the chicken breast stays soft n juicy n flavorful when being fried. So I would normally never skip marination but if you have got no time at all… you can skip it.


The second stage of flavors come after I make the chicken breast go thin with a meat hammer, you need a meat hammer to beat the chicken breast until it goes quite thin like 1/2 cm in thickness or a little more, you can also do this with a heavy rolling pin, you have to place the chicken breast inside a zip lock bag or between two plastic sheets or like I do it-directly over my chopping board.


Once the breast have been flattened to uniform thickness I sprinkle the roasted black pepper, green cardamom, cinnamon powder over it and it is ready for getting coated in breadcrumbs.


It is a very good idea to make your own breadcrumbs; the flavors are far more better than if you use store-bought breadcrumbs. I take a day or two old white bread, on a flat thick pan I toast the bread over medium low heat until it gets light brown, then take them off the heat n then blend them in a blender or food processor until it is crumbly n I don’t make it go smooth, neither will you.

I love raita, the tang of the yogurt goes well with the crispy rich schnitzel, in my raita I have introduced the sweet pungency of Japanese Wasabi- it gives raita a new flavor dimension, in the raita you can also add chopped cucumber along with red onion n tomatoes.


Another sauce that is just so good to eat with the schnitzel is the sweet chili garlic sauce, the heat from the red chili, the sweetness, the touch of vinegar- I tell you it’s mouth-watering with the schnitzel n it takes just 7 minutes to make it, that’s all.

But let’s just say you don’t wanna make any sauce, you know what! Tomato ketchup…oh yes, break apart your schnitzel n dip them in the thick tomato sauce n I don’t know what to say again. The schnitzel is just very good on its own, I love it hot n cold equally, and so will you, I love to carry these kinda food to your workplace or on a journey, so now I will take you to the recipe.

For The Recipe: You will need

For the Schnitzel:
Chicken Breast- 1 about 250 gm, made boneless
Egg-1 big
Breadcrumb- made from 2 big slices of white bread which is about 1 cup
Flour- 3-5 tbsp
Garlic-1 small clove
Ginger- ½ inch
Lime juice-juice from ½ a lime
Lime zest- from 1 lime
Rosemary- A pinch
Green cardamom-1, slightly roasted n powdered
Cinnamon-1 inch piece, slightly roasted n powdered
Black pepper- ½ tbsp, slightly roasted n powdered
Red chili powder- a pinch
Salt –to taste
Sugar- a pinch
Vegetable oil- soybean/sunflower oil to shallow fry, about 1 ½ cup


For the Sweet Chili Garlic Sauce:
Red chili fresh-1
Red chili dry-1
Garlic clove- 2, finely chopped
Rice Vinegar- 4 tbsp
Sugar- 1 tbsp
Water- 4 tbsp
Salt- a pinch


For the Wasabi Raita :
Yogurt- 5 tbsp
Red onion- ½ medium, chopped
Tomato- ½, chopped
Green chili-1 sliced
Curry leaves- leaves from 1 stalk
Mustard seeds- ½ tsp
Wasabi paste- ½ tbsp
Sugar- ¼ tsp
Salt –to taste
Pink rock salt- a pinch


1. First of all take a boneless chicken breast and marinate it with lime juice, lime zest, minced garlic n ginger, dry rosemary, a pinch of salt n a pinch of sugar, keep it overnight, covered in a plastic container preferably n not in a metal container, if you have forgotten to do it before give it 3 hours to marinate.
2. For making the breadcrumbs, place the bread on a flat tawa/pan on medium low heat, and  make them go light brown in color which will take about 6/8 minutes on medium low flame, then put them off the pan, after they cool down a bit, tear them n place them in a blender n blend them until they get uniformly crumbled n small in size, we don’t want a smooth powder, so work carefully, we still want small size granules of bread in the final texture.
3. To make the sweet chili garlic sauce, place all the ingredients in a pan over medium low heat n simmer for about 8-10 minutes until it thickens a bit, that’s all.
4. To make the wasabi raita, whisk the yogurt until it is smooth, season with salt, sugar, pink rock salt, then add onion, tomato n green chili n wasabi paste, mix well. In a frying pan take 1 tsp of oil n when the oil is hot add the mustard seeds, as they pop add the curry leaves and remove from fire, add this whole thing into the yogurt n mix well, set aside.
5. After marinating place the breast on a chopping board or between two plastic sheets and with a meat hammer or heavy rolling pin beat the breast to flatten n thin it uniformly, so start beating first in the middle portion where the breast is thick and work outwards. Don’t beat it fiercely though but firmly, have a look while you are beating at which parts are getting thinner quickly, so you need to avoid those places so that it stays uniformly thick, finally the breast will tenderize n expand in size, you want a thickness of ½ cm all across.
6. Season the flat breast with salt n the powdered cardamom, cinnamon, black pepper, pinch of red chili on both sides. Tale 3 flat plates, in one sprinkle the flour uniformly over the plate, in the 2nd beat the egg uniformly, in the 3rd spread the breadcrumbs uniformly.
7. Place the flat breast first on flour, press n flip for the other side to coat, now see the areas which are still not coated, coat both the sides carefully until it is coated all over, then shake off excess flour. Then place the breast in egg mixture n coat uniformly on both sides, drip off excess egg then place it on top of the breadcrumbs, press lightly, then flip n coat it on this side, Keep it on a dry place for a minute, then pick it n coat it in egg again, then place it in the breadcrumbs again n press well, flip n do the same, press lightly so the breadcrumbs stick to the breast uniformly, finally place it on the dry plate.
8. In a shallow flat frying pan heat the vegetable oil on medium heat, the oil should be moderately hot, to test drop a piece of bread in the oil n it should begin to sizzle with bubbles n in about 15 sec it will go brown, if the oil is too hot the outside layer of bread will go brown while the chicken won’t be cooked inside, so when the oil is medium hot place the chicken cutlet carefully in the oil, it should begin to sizzle, increase the flame to high for 7 seconds then turn the flame to minimum, check with a fork after 2 minutes lifting up the cutlet how much browning has happened, it should be light brown, give it another 2-3 minutes, we don’t want the cutlet to be very dark brown, so when the lower side is well browned, flip it carefully n give it another 4-6 minutes, until that side also gets well browned. When you achieve this take it out on a plate on paper napkins to soak the extra oil, don’t cover the schnitzel.


Wow and its ready! Time to taste, first look at the crispy schnitzel and touch it to feel the texture, smell it n then take your first bite without any sauce, I can hear the sound of crunch as you munch on, crunchy heaven….so  good isn’t it? Go on munching…Bon Appétit.

Saturday, July 18, 2015

A Fragrant Rice with Chicken, Saffron N Prawn-A Tale of Tantalizing Taste


Gobindobhog Rice cooked with Fresh water Prawn n Chicken with dry Red Chilies, Jalapenos, Saffron, Tomatoes- pure taste of delish


First I should tell you about this rice-Gobindobhog, a type of short grain rice from Bengal, the east of India. It smells amazing, how do I describe that smell, let me try- sweet, pleasant, fragrant, decent, subtle and full of promises. When you taste it, the depth of flavor coming from it takes you in a journey. So no wonder it is such a favorite rice to use when you are cooking something special, sweet or savory it handles both the sides extremely well. It has a sweet smooth buttery aromatic flavor, so often they are cooked with milk n sugar or jaggery to produce Payas/Rice Pudding/Chawal Kheer, sometimes they are cooked with chicken or fish or vegetables to produce fantastic pulao/pilaf, they are the base to make a fantastic “Murighonto- A savory rice dish with fish head n potatoes and whole garam masala”- it’s a never ending love story.


                          Now chances are if you live outside India, or even let’s say outside Bengal, you won’t get this rice easily, but still ask for this rice in Indian or Bangladeshi shops, it is every worth searching for. For this dish you can replace it with any short grain rice like risotto rice, Thai sticky rice, paella rice.


                                                                 I didn’t have a doubt when I combined this rice with prawns n chicken, what came out impressed me much more than what I imagined, the rice absorbs all the flavors so vividly, at the same time lifting the flavors up with its own flavor, in every bite I could taste the prawns, the tomatoes, the chicken, the garlic, the jalapenos, the saffron. It was like all the flavors were in harmony, n to top it all off it doesn’t take much time to cook, the rice takes 15 minutes to be done and all you have to do when the rice is cooking is to stir it in between.


Another layer of flavor comes from the aromatic spices that go in it, cloves, green cardamom, Indian Bay Leaf n Cinnamon sticks-as the broth simmers the spices release their flavor n blends into everything in the pan.


                     There are some recipes when you cook them it makes you a hero, people love you n the food that you cook-this is one such recipe. So next time there is a gathering of friends cook this and see them getting lost in the plate, which is actually a great sight to watch for a person who cooks with his/her heart.


                                    So now let me serve you the recipe, here we go…


For The Recipe: You will need

Govindobhog rice- 1 cup
Chicken breast-1 medium with bone, cut into 2 inch pieces, around 250 gm
Prawn- 4 big/ 6 medium, veined, washed but not peeled
Garlic – 3 medium cloves, chopped
Onion-1 medium, chopped
Tomato- 2 medium, chopped
Jalapenos- 2 tbsp
Green capsicum- 2-3 tbsp, chopped
Dry red chili- 1 medium, torn into pieces
Saffron- 2 pinch
Red chili powder- ½ tbsp
Turmeric- ¼ tsp
Cumin powder-1/4 tsp
Coriander powder-1/4 tsp
Bay leaf- 2
Clove-4
Green cardamom-1+1
Cinnamon stick- 2 inch
Soy sauce- a few drops like ½ tsp
Black pepper- 1 tbsp, freshly ground
Pink rock salt- few pinches
Salt
Sugar
Brown fried onion- to serve, 1 medium onion-sliced n fried till brown in a pan, it’s optional
Water-3 -4 cups
Vegetable oil/olive oil-5-6 tbsp


1.     Soak the rice in water for half an hour, then drain the water. In a frying pan heat the oil, when the oil is moderately hot reduce the heat to low, add the dry red chili torn into pieces, chopped garlic n stir,  don’t let the garlic brown, add cloves, cardamom, bay leaves, cinnamon sticks, give them around 20 seconds , then add the chopped onion. Give them about 2 minutes on medium high heat stirring often, then add the capsicum, give it 3 minutes, then add the chicken pieces, put the flame high and sauté them for about 5 minutes, stir in between. Add a pinch of sugar, mix, then add the rice to the pan and give it a good mix. Keep the flame on medium high and stir often; we are now frying the rice grains to some extent. Give them around 4-5 minutes on medium heat, then add some salt and mix well. After that add the tomatoes, jalapenos  and 2 pinch of pink rock salt and ½ tsp of freshly ground black pepper, give it a good mix n give them about 2-3 minutes. Mix the red chili powder, turmeric, cumin n coriander powder with little water to make a paste, add this to the pan and mix well. Add a splash more water so that the spices don’t burn.

         2.     Heat the water in a bowl; we will use this hot water to add to the pan. So back to the frying pan add the saffron strands, mix, now add 1 cup of the hot water n stir so that everything is uniformly mixed. Keep the flame high at this stage, add the prawns to the pan, very soon the water will be absorbed by the rice, then add another cup of water, reduce the flame to low, add salt according to taste and few drops of soy sauce, ½ tsp sugar and mix well. The water will be just simmering in the pan, when this water is again absorbed , add half cup of more water, this whole process will take about 15 minutes, at the final stage we want the rice to be not dry but with some liquid part in it. So the amount of water will vary slightly, if the rice is soft n fluffy n the consistency of it some a bit flow-y it is there, if the rice still needs to be soft add 1/2 cup water and give it a little time.

        3.     Now when the rice is soft, put the flame off, we will add the final touches. In a mortar n pestle crush one green cardamom pod and 1 inch stick cinnamon with 1 tsp of water,  when it becomes a coarse mixture add this to the rice, add some more black pepper n mix n cover the pan for 2 minutes.


So it is ready to be served, serve generously and sprinkle some brown onions over it or forget it, it tastes so very delish! Mmmmm…Bon Appétit.


Friday, June 26, 2015

Hyderabadi Tootak Tales...what flavors it hides inside

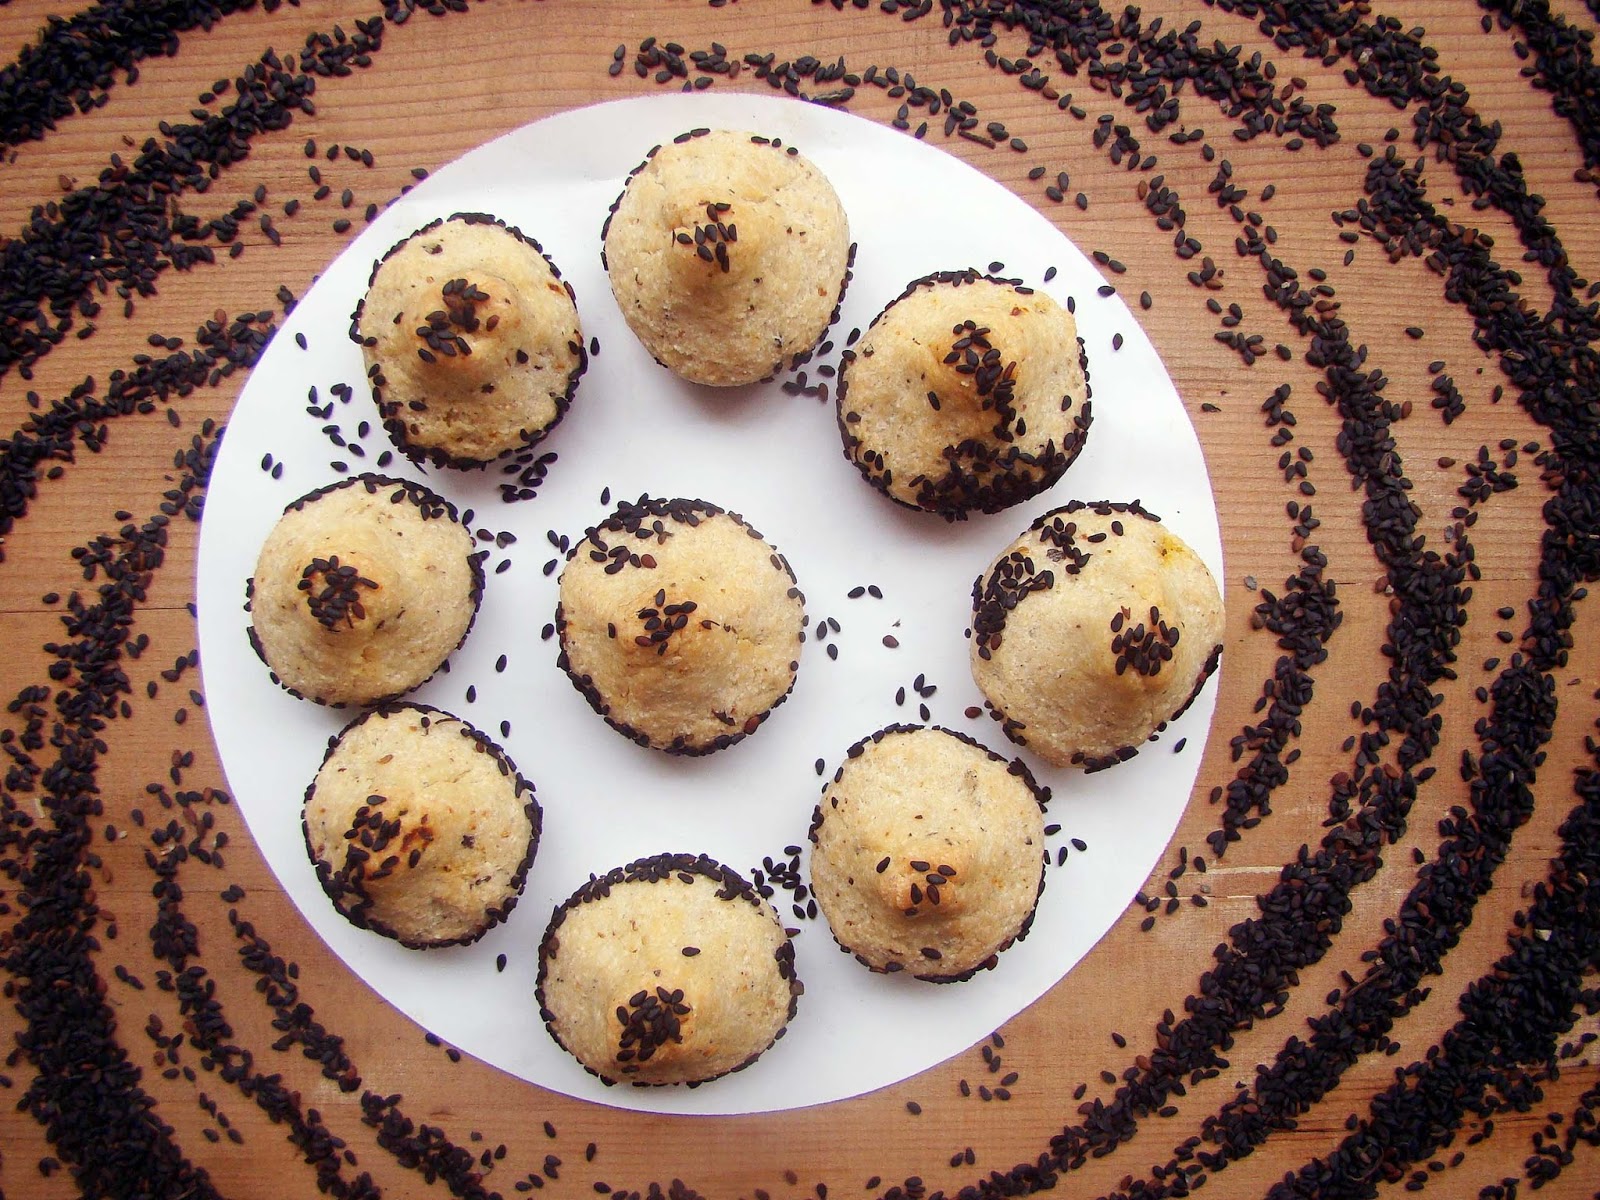
Tootaks from Hyderabadi cuisine, a tale in crispy semolina pastry n herbal spicy vegetable filling


I first thought of making ‘Tootaks’  when I stumbled upon  them inside a book n they were all over the place. They had this unusual shape which reminded me of ‘Modaks’ which comes from the neighboring state of ‘Maharashtra’ which are sweet, still they were a bit different. The top part of them were rounded, unlike modak not pointed, the lower half were oval that made them look like a traditional water pot ‘Ghati’.  Their color was subdued with a slight touch of yellow ochre n it reminded me of the color of the beach. This is how I was seduced.


The name is quite interesting ‘Tootak’ , saying their name twice gets me to the famous Indian song ‘Tootak tootak tootiyan’ but they are far from the song.  Their name derives from the Indian Hindi phrase ‘Tu Takta Reh Jaye Ga’ which will mean ‘you will be left astounding or gaping’- look at the first two words of the Hindi phrase ‘Tu Tak-ta’, so casually we can imagine tu-tak or tootak will suggest ‘you astound’- cool  eh! So they belong to Hyderabadi cuisine/ Deccani cuisine in its origin, a signature dish of the local Hindu Kayastha community people.


By structure a tootak has two parts, the outside shell, crispy, still little soft inside-that is semolina pastry treated with ghee, milk n spices and the inside filling which is traditionally made from mutton mince flavored with onions, garlic, ginger, coriander, green chilies, lemon juice . In my version I create a spicy amazing vegetable filing with carrots, coriander, barbatti, onion, garlic, ginger, shahi jeera, black sesame seed, green capsicum, jalapenos, tomato, yogurt, coconut pieces, lime juice n mint leaves.


What I really like the most is how the semolina which is sooji or rawa in Indian terms is treated to make the dough which runs almost in similar lines of creating a short crust pastry but still uniquely different. The semolina is rubbed with chilled ghee n a spice mixture until it feels like wet sand and just hold together, this mixture is put to rest for 30 minutes in the refrigerator, then it is kneaded with milk until it becomes a medium soft dough, which further rests for 15 minutes and then they are shaped with the filling inside.


I love the flavor of the  black sesame seeds, so in my version of tootaks I included them in the game both to give a depth of flavor and to create an interesting playful look for them and they looked so cool at the end of baking. Oh yes! These beauties are baked in the oven –not deep fried- so now there is one more reason for you to make them. So let’s get the hands dirty, shall we?


So now I will straightway take you to the recipe, let’s have a roll.


For The Recipe:  You will need

Makes 12-14 Tootaks


For the Semolina Shell:
Semolina/Sooji/Rawa- 2 cups
Ghee (clarified butter) - 4 tbsp, chilled
Salt- ¾ tsp
Sugar- 1 tsp, powdered
Milk- ½ cup approximately
Black pepper- 1 tsp, crushed n powdered
Black cumin seeds (Shahi Jeera) - ½ tsp- slightly roasted n powdered
Green cardamom- 2, lightly roasted n powdered
Clove- 1, slightly roasted n powdered


For the Filling:
Carrot- 1 medium, shredded
Barbatti/Yard long Bean- 2, finely sliced
Onion- 1 medium, finely chopped
Green chilies-3/4 – finely chopped
Green capsicum- 2 tbsp, finely chopped
Coriander leaves n stalks- 2-3tbsp, finely chopped
Jalapenos- 2 tbsp, chopped
Ginger- ½ inch, minced
Garlic- 2 medium cloves, minced
Mint leaves, fresh or dry-1 tbsp
Shahi jeera- ½ tsp
Black sesame seed- 1 tbsp
Fresh coconut- 2 tbsp, chopped into ¼ inch pieces
Yogurt- 1 tbsp, whisked
Tomato-1/2 of a medium tomato, chopped
Black pepper- ½ tsp, freshly crushed
Salt
Pink rock salt- a pinch
Sugar- 2 pinches
Red chili powder-1/4 tsp
Turmeric- 1 pinch
Vegetable oil- 2 tbsp


Pre-heat oven to 160 Celsius/325 Fahrenheit.


1. Let’s start by making the dough, for that put the ghee in the refrigerator for 15-20 minutes to chill it, then mix the semolina with salt, sugar, ground black pepper, the crushed spices n then add the chilled ghee n rub it in with soft hands using your fingertips, this will take about 5- 7minutes, and the mixture will resemble wet sand and the mixture will hold together when you press it lightly between your palms. If this doesn’t not happen nothing to worry, add a little more chilled ghee like ½ tsp and 1 tsp of water, rub it in with soft hands n you will see the mixture will just hold together when you press it lightly. At this point cover it with Clingfilm, rest it in the refrigerator for 30 minutes.

2. Now for the filling, put a frying pan on medium heat and heat the oil moderately, add the shahi jeera and black sesame seeds, when they sputter, add the shredded carrot, chopped barbatti beans, green chilies, coriander stalks, toss them, give them 1 minute on medium high heat, then add the ginger n garlic mince, mix, give them 30 seconds, then add onion, green capsicum, tomato, coconut pieces, coriander leaves n mix it all in. Now on medium high flame stir-fry them, we want them to caramelize a bit, so keeping the flame on medium high is important and stir them every 30 seconds so they don’t burn, give them 5 minutes like this, stir often. After that reduce the heat to low, add a pinch of sugar, pink rock salt,  then add salt, red chili powder , turmeric, add a touch of water so that the spices don’t burn, mix it all in, on the lowest flame give them 5-6 minutes. Then take the pan away from the heat for a moment, add the whisked yogurt n mix well, put the pan back on low heat and add the jalapenos, mint leaves, give them about 3-5 minutes until the whole mixture dries up. There will a lot of brown bits in the bottom, they will add amazing flavor, so dash a little water on the bottom and scratch with the spatula to mix them all in, let the whole mixture dry again and we are almost done, lastly add the lime juice, adjust the seasoning n add the black pepper powder. Take the mixture off the pan on a plate, let it cool.

3. After 30 minutes take the semolina mixture out and add a little milk n knead to mix in it, then add some more n knead, then add the rest and start kneading the dough until you get a dough which leaves sides of the vessel n comes together, knead for about 5-7 minutes and you will have a medium soft dough. Test the dough by making a small ball and shaping it like tootak without any crack, if you can do that you are done. Cover n rest for 15 minutes.

4. Now take a big lime size ball of dough in your hands n roll it between your palms with a soft hand to make a smooth ball, then flatten the ball by pressing it between your palm, now put your thumb in the middle n make a depression, lightly make that depression into a round shape, then with soft hands press all around that as you give it the shape of a small bowl, pressing down to give an uniform thickness as you go around. Then fill the bowl with 1 tsp of filling, press it lightly, then fold the sides and the top to seal the filling n bring the both the sides to the top with light hand, give that part a conical shape, then with one finger press on it to give it rounded shape. Hold the tootak, roll it by keeping it on your palm to give a flat bottom, the middle will be oval rounded and at the top it will be conical rounded. That’s all. Prepare all the tootaks like this.

5. Pre-heat the oven to 160 Celsius/325 Fahrenheit,  brush all the tootaks lightly with vegetable oil with your fingers or a brush, now scatter black sesame seeds on a flat surface. Take one tootak and make it sit on the seeds pressing it lightly, the seeds will stick to the base, then tilt the tootak and roll it lightly on the seeds on its sides, now hold the tootak upside down and press the top lightly again on the seeds, then make it straight and place them on a baking sheet. So at the end the tootak will have a sesame seed base, a rim of black sesame seeds n the top with some seeds, prepare all like this.

6. Place them in the oven, bake them for 15-25 minutes until they looks dry and when you tap them with your nail it feels hard, not soft like before, now put the top grill on in your oven and give them around 5 minutes until they just start to get color. I increased the temperature to 180 Celsius/350 F while doing this. In this point you have to careful, watch them, as they get slightly brown they are ready. Take them out n give them 10 minutes to cool, then put them on a wire rack to cool further. Eat them while they are warm n even cold.


So now munch on and share it with everybody, spread the tootaks everywhere. Bon Appétit!

Friday, January 16, 2015

The Orange Evening salad

A crunchy salad of Orange, Mexican Turnip n Pomegranate for the winter


First of all I will tell you about Mexican Yam/Mexican Turnip/Jicama/Yam Bean. It is the name of a native Mexican vine, the plant has tuberous roots which are edible, and it is these roots with which we are about to make this salad. In India we know it as ‘Shankhalu’, literally because of the similar shape of them with white conch/shankha. In Hindi it is called ‘Mishrikand’. This plant belongs to the bean family. The flesh of the tuberous roots is eaten mostly raw or sometimes cooked, the flesh is crunchy, slightly sweet n creamy and the flavor reminds us of some apples. It is sometimes also called ‘Chinese potato’, ‘Mexican potato’.


                    Though it is native of Mexico, it got spread perhaps through the hands of the Spanish into many countries of Asia like China, Philippines, Indonesia, Japan, Myanmar, India, Bangladesh and many more. In Mexico the Jicama is popular in salads with other fruit combination. The same is true for Philippines, Myanmar; however in these countries they are also stir-fried along with herbs n spices. 


                                                               Here in India, we get this around the winter, now that it is winter it is abundantly available in the vegetable market.  At the end of January there is a special puja of goddess Saraswati, who is the goddess of music n learning, in that occasion of worshiping her when people prepare an offering with fruits they often include this ‘shankhalu’. The shankhalu is simply peeled, the inner crunchy white flesh is diced into cubed and simply eaten like that, they are subtly sweet, slightly aromatic and the smell of them seems very calm when I have to describe that smell. Back home we eat in the same way, sometimes my dad would sprinkle a touch of red chili powder, a bit of pink rock salt or normal white salt and it is so fun to eat. These days sometimes I add a slight hint of chaat masala on them.


                                                                                                This year when Saraswati puja will come, things will happen the same way but my dad won’t be there, since he has left his body he won’t be able to taste it like before and I will have a bundle of memories of this time of the year with my father.


Yesterday I discovered one big Mexican turnip under the table hidden in the dark, it got unnoticed for some time but the good thing about them is that they keep very well for a long time, so when I peeled it was just as fresh. So I picked oranges, a pomegranate, a few roasted peanuts and this delicious fruit salad was born. It looked so wonderful, the crunch from the Mexican turnip, its slight sweetness, the citrus sweetness of oranges, the crunchy pomegranate and the touch of pink rock salt, chaat masala and the burst of colors made me feel better in the evening.


So now I must tell you about how to make this winter fruit salad. Eat it specially facing the sunlight, you will feel better.


For The Recipe:  You will need


Shakalu/Shankhalu/Mexican yam/Mishrikand- 1 big, peeled n diced into 2 inch thin sticks
Orange- 1 big, peeled and sliced breath wise n get the seeds out
Pomegranate- one handful of pomegranate seeds
Chaat masala- ¼ - ½ tsp
Pink rock salt- 2 pinches
Black pepper- freshly ground, some pinches
Red chili powder- 2 pinches (you can skip it also)
Salt- a pinch
Peanuts- roasted n take off the outer skin


1. First peel the shankhalu with a peeler, the outer layers will be fibrous, so once the fibrous layer comes off, peel it a little more until you reach the crunchy white flesh. Half the shankhalu from the middle along its length then halve each half. Then slice each quarter along the length into thin slices, keep some slices intact for the shape, then with the rest, slice them into thin sticks.
2. In a bowl keep the sticks together, sprinkle pink rock salt, red chili powder, black pepper, chaat masala and salt, toss them with the spices. Check for the salt now because chaat masala is a mix of salt n spices, so we have to balance, add in little amounts and check until the seasoning is right. Take some pomegranate seeds and crush them in your hands and let the juices fall on the sticks, mix.
3. In a plate arrange first the whole thin slices of shankhalu, then arrange the orange slices on them, crush some pomegranate seeds on them so that the juices fall on the shankhalu and orange segments, then in the middle put a handful of the flavored shankhalu sticks, sprinkle more pomegranate seeds all over them and last sprinkle the roasted peanuts over them. Now you see how beautiful it looks!


So now it is time to serve, eat with a smile and the salad will make you smile even more. Bon appétit.