Featured Post

Go Galette Go! My heart will always Galette on…

5 Beautiful Galettes: Red Pear Galette, Peach Tej Patta Galette, Panchphoron Mango Chutney Galette, Cherry Clove Galette n Paneer Tomato B...

Sunday, August 17, 2014

Cherishing the Cherry Clafoutis ...

Red Cherry Clafoutis with a hint of spice to lift it to new heights and let’s not forget the old secret tradition; using cherries with pits


                                                                  Clafoutis! Clafoutis!
                                                           The cherries roll on my finger,
                                                          U loose urself, let it be, let it be
                                                         Inside my mind now u just linger.

Well that’s a new start for my blog post, with a tiny poem! A month ago when I had a box of cherries in my hand, I rubbed my chin for what all I’ll be making with them, as it turned out I made only clafoutis, the rest I ate simply. Now I always tend to believe that fruits are always best eaten alone not just for their nutritional values also because I feel their flavor is reduced at the end of it. So before making the clafoutis I had my doubts which got cleared away to some extent after I made it. You can guess why? Because the clafoutis was delicious.


                       Clafoutis come from France, the region of Limousin, almost the central region of the country. Traditionally clafoutis is always made with black cherries, but other seasonal fruits are often used in making clafoutis such as pears, prunes, apples, cranberries, blackberries. In fact there is another name often used when any fruit other than cherries are used, known as ‘Flaugnarde’. The French pronunciation of clafoutis is ‘Klafuti’ or ‘Cla-foo-tee’. Now when we do say it like that note how it makes us smile at the end of it.


                                                      It is a baked desert of fruit, traditionally of cherries, arranged in a buttered n sugared dish and a batter is poured over the cherries without completely drowning them and then baked in the oven until it is set and starts to brown on the surface. The batter is made with eggs, milk, cream, sugar, flour, butter n basically that’s it. Now the alternations happen on this basic recipe as everyone alters it with their own taste.


In my version most importantly I've kept the whole cherries with their pits as it was done traditionally unlike the versions we most see on internet where the pits have been removed for the ease of eating! But then you remove one thing and you have to deal with the loss of flavor. And talking about the ease on eating! Come on, once you know you have made a clafoutis with whole cherries your brain automatically knows not to bite into that like a blind brain!


                                                                                 I have made two versions of clafoutis-one with the pitted cherries one without. And the result is the one made with cherries with pits, was much more flavorful n more delicious. So pits make a difference. In fact reading about it in Wikipedia taught me that the pits contain an active chemical called ‘Amygdalin’, during baking some amount of this chemical is released into the clafoutis, thus creating a delicious difference. Think about saving time also, you don’t have to pit the cherries, now isn't that nice? Now if you are serving it for your guests and if you don’t want them spitting cherry pits, then you remove it before baking knowing that it will be less delicious automatically.


                                             I have used black pepper and cloves in my versions, and guess what! Cloves go so well with the cherries, esp. the one I had, it is indeed a good combination, clove is a strong spice and we have to be careful because a little goes a long way. I used red rum to macerate the cherries along with the sugar n powdered clove n black pepper. I did not have ‘kirsch’ with me which is a cherry brandy which would've been nice but I love the flavor of red rum and so does cherries.


                                                                          While making the batter which gets poured over the cherries instead of plain butter I used ‘Beurre Noisette’ which is butter that is browned in a pan until the milk solids get separated and browned and it attains a nutty flavor. I love the flavor of that in many recipes.

So now I will take you to the recipe of clafoutis right away


For The Recipe:  you will need
For macerating the cherries
250 gm whole cherries
2-3 tsp of powdered sugar
1-1 ½ tbsp of red rum               
1 clove, slightly warmed in pan n powdered
Freshly crushed black pepper
For the batter
2 eggs
2-3 tbsp of flour
2 tbsp of powdered sugar
2 tbsp of milk
60 ml single cream
Pinch of salt
1/2 clove, warmed in a pan n powdered
Freshly crushed black pepper
1/4 -1/2 tsp of vanilla extract
20 gm of brown butter-beurre noisette
For buttering the ramekins
1 tbsp of lemon/lime zest
3 tbsp of powdered sugar
Pinch of clove powder
Some soft butter
                   

Texture of the batter has to be a pouring liquid consistency, preferably thin n not very thick; keeping the texture in mind we can adjust the amount of milk and cream n flour or eggs.
Pre-heat the oven at 180 Celsius.


1.  First with a paring knife cut the cherries along its length around the pit but don’t separate the cherry in half, with your fingers open the two half a bit just to expose the flesh. Now when all the cherries are done sprinkle  about 2 tsp of powdered sugar mixed with the clove powder, sprinkle some crushed black pepper on them and then add 2-3 tsp of red rum over them, toss them in that and let them macerate for half to an hour.

2. Grate the lemon/lime zest and mix that with the powdered sugar n pinch of clove powder kept for buttering the ramekins. Now butter the ramekins well, pour the sugar mixture into them and move around the sugar over the butter coat so the sugar creates a coating over the butter layer. Set aside.

3.  Take 20 gm of butter in a pan and on a medium flame let it melt, you will notice hiss sound as it keeps getting warmed, when the sound ceases down it is beginning to go to become beurre noisette, lower the heat now and within a minute you will see the separated milk particles below the butter had started to go brown and the whole butter has become brown in color. This is it, take it off the heat.

4. Time to make the batter, so in a bowl whisk the two eggs lightly, then add a pinch of salt, the milk and whisk lightly again. Then add the flour and whisk so there isn't any lump n nicely combined. Now add the brown butter, vanilla extract, powdered sugar, half clove powdered, freshly crushed black pepper, the cream and whisk to combine. Bring out the cherries now, you will notice some amount of liquid has gathered at the bottom of the cherries, add this liquid to the batter and combine.

5. In the baking dish/ramekins first lay the cherries, the base should be covered with cherries and some over them press the cherries lightly to pack them tightly. Then slowly pour the batter over them so that the batter drowns the cherries almost ¾ but not completely. Some of the cherry surface should be exposed. Now place them in the oven at 180 Celsius for around 30 minutes until the batter starts to go lightly brown on the surface. The batter will rise during baking. The batter should be crusty outside and soft n gooey inside. Let it cool so you can handle them. Serve them on their own or with crème fresh.


Cherry Clafoutis is ready for you now. Dig in with a spoon when it is warm or I like it more when cold. Bon appétit.

Tuesday, July 29, 2014

The Yummy-licious Summer Salad

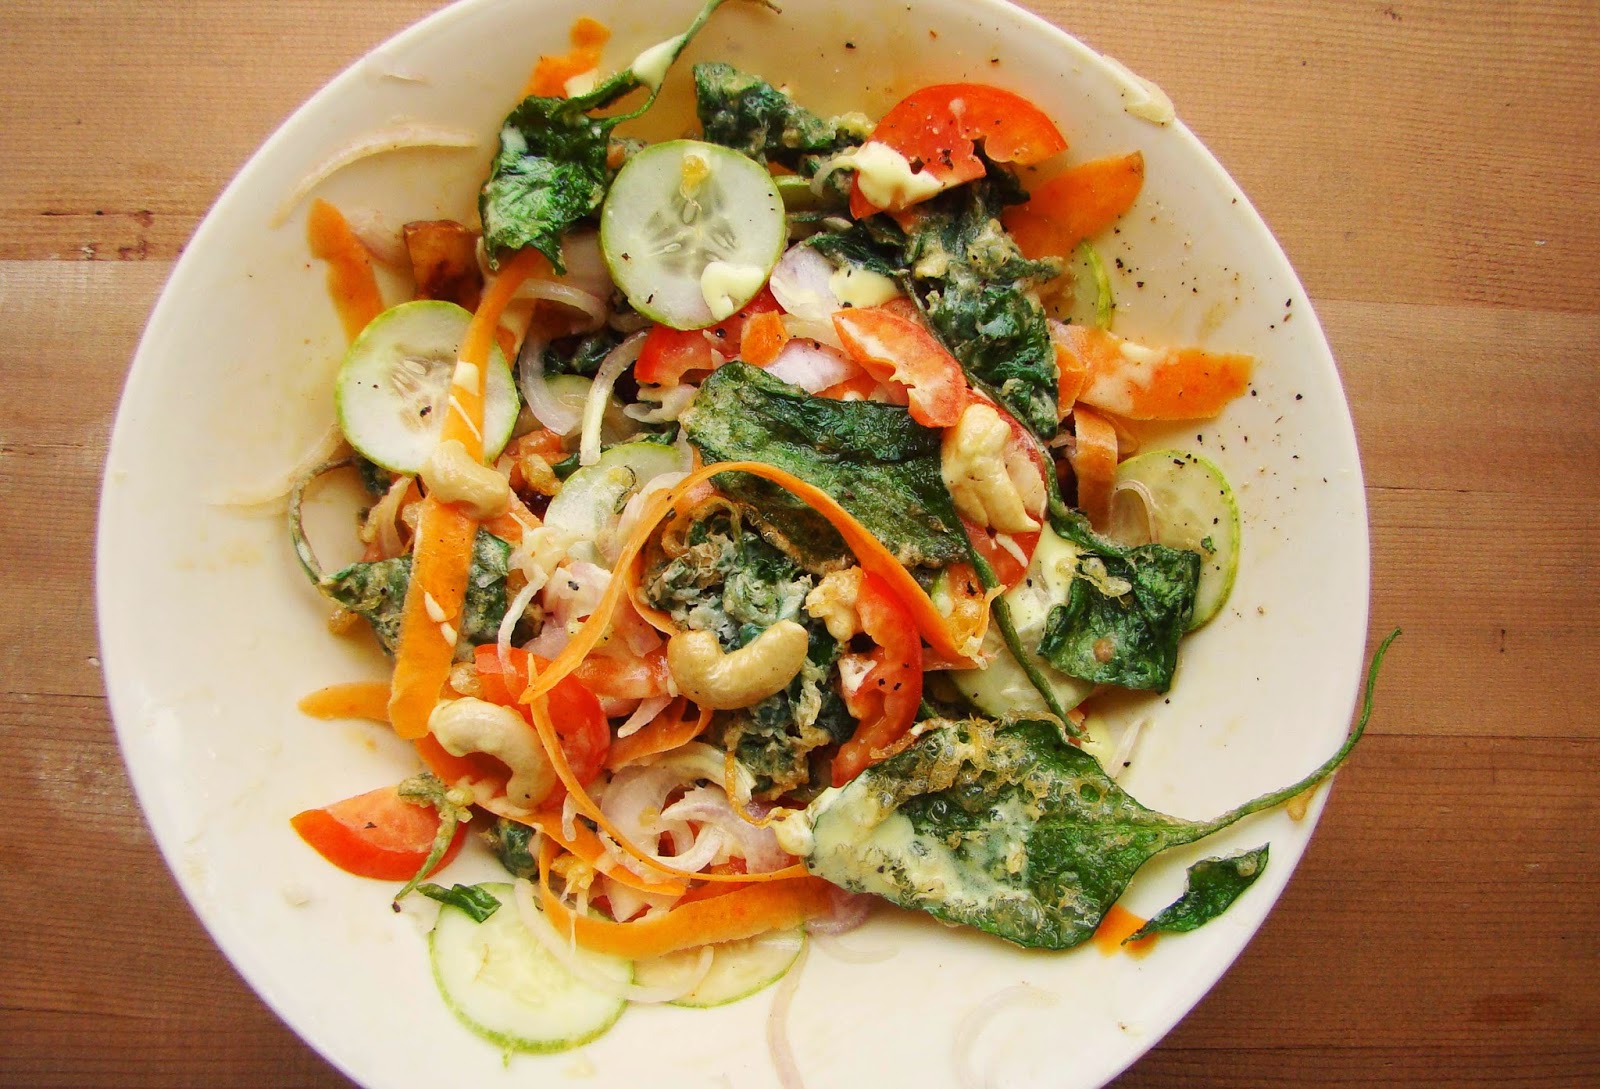
 Summer salad-Crispy Spinach salad with tomato, cucumber, Bandel cheese n carrot


The way this salad hits the taste buds is unreal. Gushes of saliva rush to mix with the crispy egg-coated spinach, the honey-mustard dressing, the onions, the carrots and the cheese as you munch on-oh! How can I tell you how unreal is that? N I gulped n gulped until the bowl stared looking empty after 5 minutes and I knew I was getting full, but I couldn't stop. I mean people are not supposed to get full by eating salad, right? Especially be eating so much of salad but then I was taken-literally taken n owned by this amazing salad. Oh reader if you have read so far I am only thinking when you will eat this salad and write me about it! It is gonna be so much fun listening to you. In fact when I was eating it I thought I would probably skip the main menu if this salad is being served just before that. Yes it is just that good.


                                                                            Its monsoon here, not yet the end of summer however and in the vegetables market now-a days I get to see fresh bunches of small spinach. Well I am not a spinach fan anyways but the few ways that I like to eat them is when I transform them into crispy spinach in my kitchen. Mostly how I do is I coat the spinach with a light batter of eggs n corn flour and I deep fry them, it takes around a half a minute for each batch to go crispy and its yummm… it takes a bit of patience however.


                                                                        When I started thinking about creating this recipe I first thought the crispy spinach and then I add tomatoes, carrot ribbons, cucumber, slightly golden cashew nuts for their crunch and flavor, the red onion, the lime, honey-mustard dressing and a very special cheese. It is called Bandel Cheese and it is a local cheese here and it mostly comes from the place called Bandel-hence the name. the Bandel cheese is a smoked cheese, the texture is soft n crumbly, it is an un-ripened cheese, they are really tiny, they are like small patties and they will be mostly shorter than the length of you little finger. The first thing you will notice when you bite into the cheese is the smoky flavor. In fact there are 2 kinds of this cheese-plain which are white in color and smoked, brown in color. It is quite aromatic when it is fresh and softly crumbly.


                              Now with this cheese I do something special, the cheese is quite salty, to give it another layer of flavor I make a little caramel and I brown the cheese slices in the caramel and it happens almost in seconds, after that I splash a bit of balsamic vinegar over them and sometimes a pinch of red chili powder if I feel like it n it becomes amazing. In this salad I use that cheese like this. Now I will tell you about the recipe…do make this salad when you get your hands on some fresh spinach and hopefully you will love me at the end of eating that. If you do not have Bandel cheese just go for a soft crumbly cheese like feta, you can even go for ricotta but then let your imagination run free, let it make you happy. Bon Appetit.


          For The Recipe: you will need
200 gm of fresh spinach leaves (prefer small if available)
2 Bandel cheese
1 medium egg
3-4 tbsp of corn flour
1 small cucumber sliced in thin round circles
1 medium red onion halved n sliced
1 medium red tomato halved n sliced
1 small carrot, with a potato peeler, make ribbons by peeling it along the length
1 lime
6-7 cashew nuts, slightly golden in oil and broken in pieces
3-4 tbsp of Honey-mustard dressing (use ready-made or make your own)
Salt
Pinch of pink rock salt
Freshly crushed black pepper
1tbsp of vegetable oil, reserved from the oil in which the spinach is fried
1 ½ -2 cups of vegetable oil


1. let’s start with the cheese, then cut the vegetables, then we will fry the spinach and then we will assemble the salad. So slice each bandel cheese into 3-4 discs, then in a frying pan place 1 tsp of sugar, sprinkle some drops of water on them for the heat to evenly distribute, on a medium flame let them go to dark caramel stage, then place each disc on that caramel, then turn them over after 10 seconds, you will see they have browned and become softer, then splash 1 tbsp of balsamic vinegar on them, as it dries take them off the pan.

2. Peel the carrot and then keep peeling to get the carrot ribbons. Prepare the other vegetable as said. Sprinkle a little lime juice over the sliced onions.

3. Wash the spinach, pat it dry with a cloth, then in a vessel break the egg, whisk lightly to combine, in another bowl add the corn flour with 1 tsp of water, mix it then add it to the egg mixture, add a pinch of salt and freshly ground black pepper in the batter. The batter should be runny n light; you can add more corn flour and a bit water to get to that consistency while increasing the volume. Now heat the oil in a wok, let the oil heat up on a medium flame for 4-5 minutes, don’t make the oil go smoky, we need it below that temperature. So now in the batter dip some of the spinach leaves and first one leaf in the hot oil carefully to test how hot it is. It should take about 10-15 seconds on each side for the batter to crisp up and attain a golden color. Once it is attained fry the spinach leaves like this in small batches, in every batch place about 6 -9 leaves depending on the size of the wok. When the spinach is done sprinkle little salt over them, now  let off the heat  and place the cashew nuts in the oil, let them attain a slight golden hint then take them off.

4. Now with the honey-mustard dressing add the lime juice and mix it, add 1 tbsp of the oil in which the spinach is fried and mix well with the honey-mustard dressing. Now place everything in a big bowl excepting the spinach and add the honey-mustard dressing, pinches of salt and the pink rock salt, freshly ground black pepper and mix until everything is coated. Then lastly add the crispy spinach. Taste and adjust the seasoning.
 And guess what you are done!


Now dig in and let the flavors explode!

Friday, July 11, 2014

Kulfi Kulfi!

The Inside-Mango kulfi- Cardamom- Mango kulfi served inside a mango-The special Indian Ice-Cream


Kulfis are so much fun- a breath of relief n joy in the hot summer evenings, full of flavors from fruits, nuts, flowers, saffron- they are a delight who gathers small crowd in the family tables with high anticipation. Kids love it and perhaps adults like it even more. In different parts of India different flavors of kulfi would be preferred and also would be spelled slightly differently such as “Khulfi” or “Qulfi” or “Koolfee”. Unlike ice-cream which is whipped Kulfis are not whipped and therefore they have a denser n solid texture being frozen, it takes a longer time to melt because of the same reason.


                                                    Kulfis being more solid n dense in texture you have to bite into a kulfi rather than licking as it starts melting in your mouth. Full-cream milk is simmered for a long time as the milk thickens, developing a distinct flavor and becomes more creamy. They are known as The Indian Ice-cream in other parts of the world. The traditional flavors of kulfi used to be Pistachio, Malai(cream), Rose, Cardamom, Saffron, in these time a huge variety of flavors have appeared, some of them being Mango, Paan(betel leaf), Thandai( a drink made with almonds, milk), orange, apple, strawberry, peanut.


When I was a kid, the Kulfiwallas used to visit our streets with their collection, the kulfis frozen in the kulfi molds inside an earthenware vessel called “Matka” which is filled with a mixture of ice n salt inside which the kulfis get frozen. It was a moment of temptation n anticipation when a kid would convince his parent after much effort those days to buy him a kulfi. In the modern changing times the Kulfiwallas have reduced in number, now-days some of them carry a box of thermocole full of ice and kulfis. But that doesn't mean that their kulfis are inferior neither the popularity of traditional kulfi has reduced nor is the technique of traditional kulfi making lost. In fact it is very much alive. What is most notable however is the difference in texture between the kulfis made in the traditional way and those made at home feels like.


                                                                                 At home we tend to freeze them in refrigerator and in the traditional method the kulfis are frozen inside a earthen terracotta mold and then they are placed inside a Matka/Kulhar which is full of ice n salt, the kulfis rendered by this slow freezing develops a smooth saturated creamy mouth feel and not a slightly crunchy texture in the refrigerator kulfis because of the presence of water crystal in them. Also notable is the flavor in the traditional kulfis which carry the essence n subtle flavor of the terracotta pots in which they are frozen and it is such a desirable flavor that is lost in metal kulfi molds.


                                                                 The birth of kulfi began perhaps during the time-period when the Mughals ruled a big part of modern day India-16th to 18th century. The love affair of the Mughals with food is renowned and truly they were food-fanatics. Numerous recipes were invented in the Mughal kitchen which was never sort of money or supplies of food items from across the vast land on Hindustan-now India- and from around the world. During their time ice from the hills of Himachal Pradesh was shipped down the Yamuna to Delhi and it is during that time perhaps that kulfi was invented in the Mughal kitchen. However there is a Persian precedent for this desert and the name also has its source from the Persian word for ‘Lock’. Given that fact that the Mughals were very fond of the Persians, there is huge influence of the Persians on them, it is no wonder if the origins of the kulfi had its hand stretched to the Persian culinary traditions.


Now traditionally as aforementioned, milk was thickened by slowly simmering it for a long period of time, stirring from time to time to keep the milk from sticking to the bottom of the vessel where it might burn and done so until it’s volume has reduced to half or one-third. The resulting milk is high in lactose, fat, protein density and it has developed a distinct taste due to the process of caramelization of lactose and sugar during the time of cooking. This thickened milk is flavored and poured into special earthenware moulds, namely kulhars with their mouth sealed or into conical molds, they are then submerged into a mixture of ice and salt , these whole ice n salt mixture resides inside another earthen vessel named as ‘Matka’ which is shaken gently till the kulfi freezes. The Matka provides insulation from the external heat and slows down the process of ice melting. The traditional earthenware pots impart a distinct n lovely flavor to the kulfis and they will be known as ‘Matka Kulfi’. Those days a pot full of kulfi-Baraf ki Handi was a very special gift to send someone.

                         At the restaurants and  the road-side Kulfiwallas  often serve kulfi with ‘Faluda’ and a rose/strawberry sugar syrup, faluda are rice noodles which add a different texture to the kulfi being served, the additional sugar syrup provided another layer of flavor, many people however prefer their kulfis without the faluda.


                                      Modern day kulfis are often made quickly making use of condensed milk/milk powder/mawa-dried solid milk/white bread/corn flour/evaporated milk which thickens the milk quickly thus arriving at the same texture at which the kulfis are frozen. The process of freezing using the mixture of salt n ice was introduced in India perhaps by Akbar as told by Abul fazl who was his vizier/political adviser.

Now it is time to give the recipe for my inside-the-mango kulfis.

For The Recipe: you will need
600 ml full-cream milk
3 small/2 medium ripe mangoes
2 heaped tsp of powdered milk
4-5 tsp of granular sugar (according to taste)
2 green cardamom pods slightly roasted and crushed into a powder
Pinch of salt
                        

1.       Begin by preparing the mangoes, wash the mangoes, wipe dry, then with your fingers start mashing the pulp of the mango softly from over the mango skin, work softly around the mango until after some time you feel the whole flesh of the mango inside have been quite soft like semi-liquid. Don’t work so forceful that you damage the skin of the mango because it is inside the mango where we will freeze the kulfi mixture, now with a sharp knife make a 2 inch cross-slit on the top of the mango, it will look X. now turn the mango upside down on a plate and slowly push the mango pulp through the cut you have made, work softly, you will feel the mango seed is trying to get out of the slit along with the mango pulp, be careful as you push the mango seed softly out of the mango, turn it softly with your fingers inside the mango so it can get out of the mango easily. Once the seed is out push out the remaining liquid pulp from inside the mango, then make the mango regain its previous shape with your fingers carefully. Do the same with all the mangoes, then place them on a egg-holder or somewhere they can stand vertically, place them in the freezer.

2.       Take a big wide pan for the milk, rinse it with water then pour the milk in it. If you rinse the pan of your milk with water before you put the milk in it, the milk won’t easily scorch in the pan. Put the flame to medium; let the milk come to a boil, with a big metal spoon scratch the bottom of the pan and the sides so that nothing sticks to them. You have to do that every 2-3 minutes throughout the time-period while the milk is reducing in the pan. Let the flame be on low to medium, time by time as you scratch the sides of the pan you will see milk solids gathering; include them into the milk as you scratch the sides. It will take about 15-20 minutes for the milk to reduce to half its original volume, scratch the bottom often making sure nothing is sticking at the bottom. When the milk has reduced to half by the end of around 20 minutes you will see it has thickened and it has got all the milk solid parts in it that you scratched from the sides n incorporated into the milk. If you taste it you will find it has a unique taste, now take the 2 tsp powdered milk in a container and pour a little of the thickened milk in it to dissolve it, when dissolved add it to the rest of the milk, let the flame be on low this time, add the sugar, let it melt, taste n adjust if you need more sweetness, remember the mangoes will add a bit of their sweetness when mixed, so keep it slightly less, lastly add a pinch of salt and take it off the flame.

3.       In a frying pan on low flame roast the cardamom pods for 1 minute then crush them in a mortar n pestle, discarding their shells. Add the cardamom powder to the thick milk, mix well, now let it cool and come to room temperature. As it cools take the mango pulp that you had and either just crush them in your hands so they become like a loose paste or do the same in a food blender.

4.       When the milk has cooled down completely add the mango pulp, you don’t need to add the whole amount of mango pulp, probably half amount will do, taste it, if you think you need more add more.

5.       Take out the frozen mango shells out of the freezer and pour the mango kulfi mixture with a spoon inside them, when done make sure they are stable in their holder and won’t tilt sideways, then carefully place them in the freezer and give them 7-8 hours or overnight until they are frozen.

6.       When completely frozen take them out and take one mango out of the stand and with a very sharp knife cut the frozen mango kulfi into long sections, dip the knife in hot water if you need to help cutting through the frozen mango kulfi, being careful all the time. Now you must attack them and enjoy them as they melt slowly, sloooowwwllllyyyyyyy……

Sunday, June 29, 2014

Bhapa Chingri

Prawns steamed in a sauce of fresh coconut n mustard oil

From the heart of Bengal to the out shores of the world


           The magic starts when you cook them with love, then the smell carries the magic with her, she captivates your heart, taking you on a journey of anticipation. Anticipation-it has such great power, so much it can be enjoyed on its own. There is a saying here which says that we eat half by the smell at first, then the eyes, the rest half on your tongue. The first half is built upon anticipation. Floating through the air the smell takes me high with it. Later when I open the box she catches my eye with that look, oh! And that big hug of the smell pushes me to the pick of my own anticipation. So often there comes the moment when the reality bite fails to reach the level of anticipation it has built, won’t you agree? Gladly just the opposite becomes true with these steamed prawns! As I taste her, her aroma, taste engulfs me, making me smile, making me want to eat it more n more, never stop, I wanna absorb this taste like a sponge but my senses reach saturation but still I’m only hoping for more, it reaches as if a sense of appreciation for the abstract!


                                          Here I engraved my feelings for the steamed prawns in fresh coconut. This is my all time favorite dish with prawns- hands down, hats off, bow kinda feeling. I have tasted numerous preparations with prawns, shrimps in many places and often one beats another if there is any sense of competition in them but then there is this “Bhapa Chingri” and no one can touch her. In its simplicity, in the looks, in the get-you-high smell and the insatiable taste-she will win you over and over.


                                                                                                                      It all starts with a few ingredients, in my version they are even fewer- sometimes less is more. And there is almost no big cooking at all. Now for the fresh coconut I have to say if we are using dry coconut it will give a completely different flavor, fresh coconut and dry coconut will bring very different flavors in the final result so if you feel like cooking this authentic version go for fresh coconut. And then when you have a fresh coconut in hand, break it into 2 halves, then with a coconut grater, grate the flesh softly and you will see white soft heaps of fresh coconut makes a little mountain as you grate, pick up some with your hands and eat that, juicy, succulent, tender…u la la! Now we need to make an almost smooth paste of it, we can do it in a heavy stone mortar n pestle or in a flat stone grinder or the modern food blender. Now this is the only tough work. For someone who is new to this it will seem quite an amount of work but then everything new seems tough, isn't it?


In the many versions of Bhapa Chingri across the land, there happens the variation of the ingredients. In my version there is use of freshly grated coconut, green chilies, mustard oil, a touch of cumin powder, coriander powder, turmeric, sugar, salt, bay leaf, water along with the prawns. In the other versions we will find the use of mustard paste- black mustard seeds made into a paste-known as sarson paste/sorshe paste, poppy seeds paste-known as Posto/Khashkhas. While some like to add a bit of yogurt, some likes to add an onion or crushed black pepper. One of the things that always stay the same is the use of fresh coconut and mustard oil. The interesting thing about the fresh coconut is that when the prawns are getting steamed in that all the flavors of the prawns dissolve into the flavor of the coconut milk inside the coconut, the mustard oil with the hint of pungent warmth dissolves into that- a beautiful marriage.


                                     My memories of it is connected to the smell, the vibrant yellow hue of the dish may remind you of the happy sun or just make you smile while you close your eyes and be nosy. Hahah! While I was small boy I used to dip my fingers into the sauce and lick them, I didn't want any sauce to be left at all, so often I would add some rice to the pot where it has been cooked and coat the rice with anything that remained in there, I was so mad about it. Eat it with white rice and it won’t fail to amaze you, this is the heavenly combination.


                                Somehow I am inclined to call this recipe simple, but then I think it is not too simple, I mean this recipe I’m presenting is simple, but if someone goes for the poppy seed paste and mustard paste, it adds to the work. But then there is something about this dish that spells simple. Apart from all of that you must try it; if you love seafood this will bring peace to your mind and something more. Why don’t you explore that side to see what it brings to you? Let this be an adventure.


           It’s time for the recipe now. Bon appétit.


For The Recipe: you will need
Prawns medium to big- 250 gm
Freshly grated coconut -1/2 of medium coconut
Green chilies -2
Turmeric powder- 1 tsp
Mustard oil- 5 tbsp
Salt to taste
Sugar a pinch
Bay leaf- 1, you can skip it also
Cumin powder- ¼ tsp, about 2 pinches
Coriander powder- ¼ tsp, about 2 pinches

1.       Begin by DE-veining the prawns, you take a sharp knife and along the middle of the back of the prawn held in your hand make a narrow slit along the length. Insert the tip of the knife gently in that slit and take out any tiny thread like vein that comes out, pull that out of the prawn, discard it. Do the same with the rest of the prawns. Some people tend to have a problem in their stomach if the prawns are big and if you don’t DE-vain them while for some people it doesn't make any difference. Now sprinkle ½ tsp of turmeric powder on them, rub them in that and leave them aside.

2.       Grate the coconut with a coconut grater, then in heavy stone mortar n pestle or in a flat stone mortar n pestle or in a blender grind the grated coconut with 1 green chili, let it become almost a smooth paste, add some water to help the process either in the blender or mortar n pestle.

3.       Now we are ready to put it all together, in the deep container where you are going to steam them, add the prawns, the coconut paste, pinch of sugar, salt to taste, rest of the turmeric powder, 1 green chili chopped, bay leaf, cumin n coriander powder and the mustard oil. Mix everything well, add 1-1 ½ cup of water, mix well, taste to see the salt, adjust.

4.       Now in a broad pan bring some water to the boil or if you are using a steamer add the water. When the water comes to a rapid boil, close the container with the prawns in them with a lid, then put a stand on the boiling water, then place the container on the stand, cover the whole pan with a lid. On a high flame at first give 5 minutes, then you can reduce the flame to low and give this 10 more minutes, at the last 5 minutes you can increase the flame again to medium high or high. Make sure there is always water in the pan.

5.       After 15 minutes put the flame off, take out the container from the steamer and give it 5 minutes to cool off a bit. Then carefully n slowly open the lid. You know what! This is the moment, full of things I can’t describe. From here on begins your journey with Bhapa Chingri! Indulge.